- All
- .Pre-Purchase and used units questions
- Air Suspension
- CCF Activations
- Diagnostic
- IIDTool Troubleshooting
- Updating your IIDTool/EASControl
On 2017+
Send us the ECU Info for verifications of the Deployable Tow Bar ECU firmware version. Menu–ECU Info, use the send email button. No screenshot please.
Once updated or confirmed at the correct firmware,
Menu–Car Config–Complete List
-MultiCAN5055 – Fitted
-If 2021+ and X761 or L560: MultiCAN7053 – Type 1 (440 Hall counts) on TBM
-If 2021+ and L462: MultiCAN7053 – Type 3 (515 Hall counts) on RBM
-If 2021+ and L663: MultiCAN7053 – Type 4 (355 Hall counts) on RBM
IIDTool Menu -> Service/Test -> IMC-Infotainment Master Controller -> CCF Relearn
Let the car go to sleep, lock the doors and wait 5 minutes.
Remove any object from the running boards
Enter the vehicle and close all doors.
On the Nav screen,
-Click on the Deployable Step button.
-Click on the Power button.
-Open the driver door, the steps will hide inward.
-Close the door, wait until the soft close, if present, closes the doors completely.
-Open the doors, steps should go outward.
-Repeat on the passenger side.
-Set the steps to Roof Access Mode
-Tighten the final bolts, 48 NM.
–Under testing–
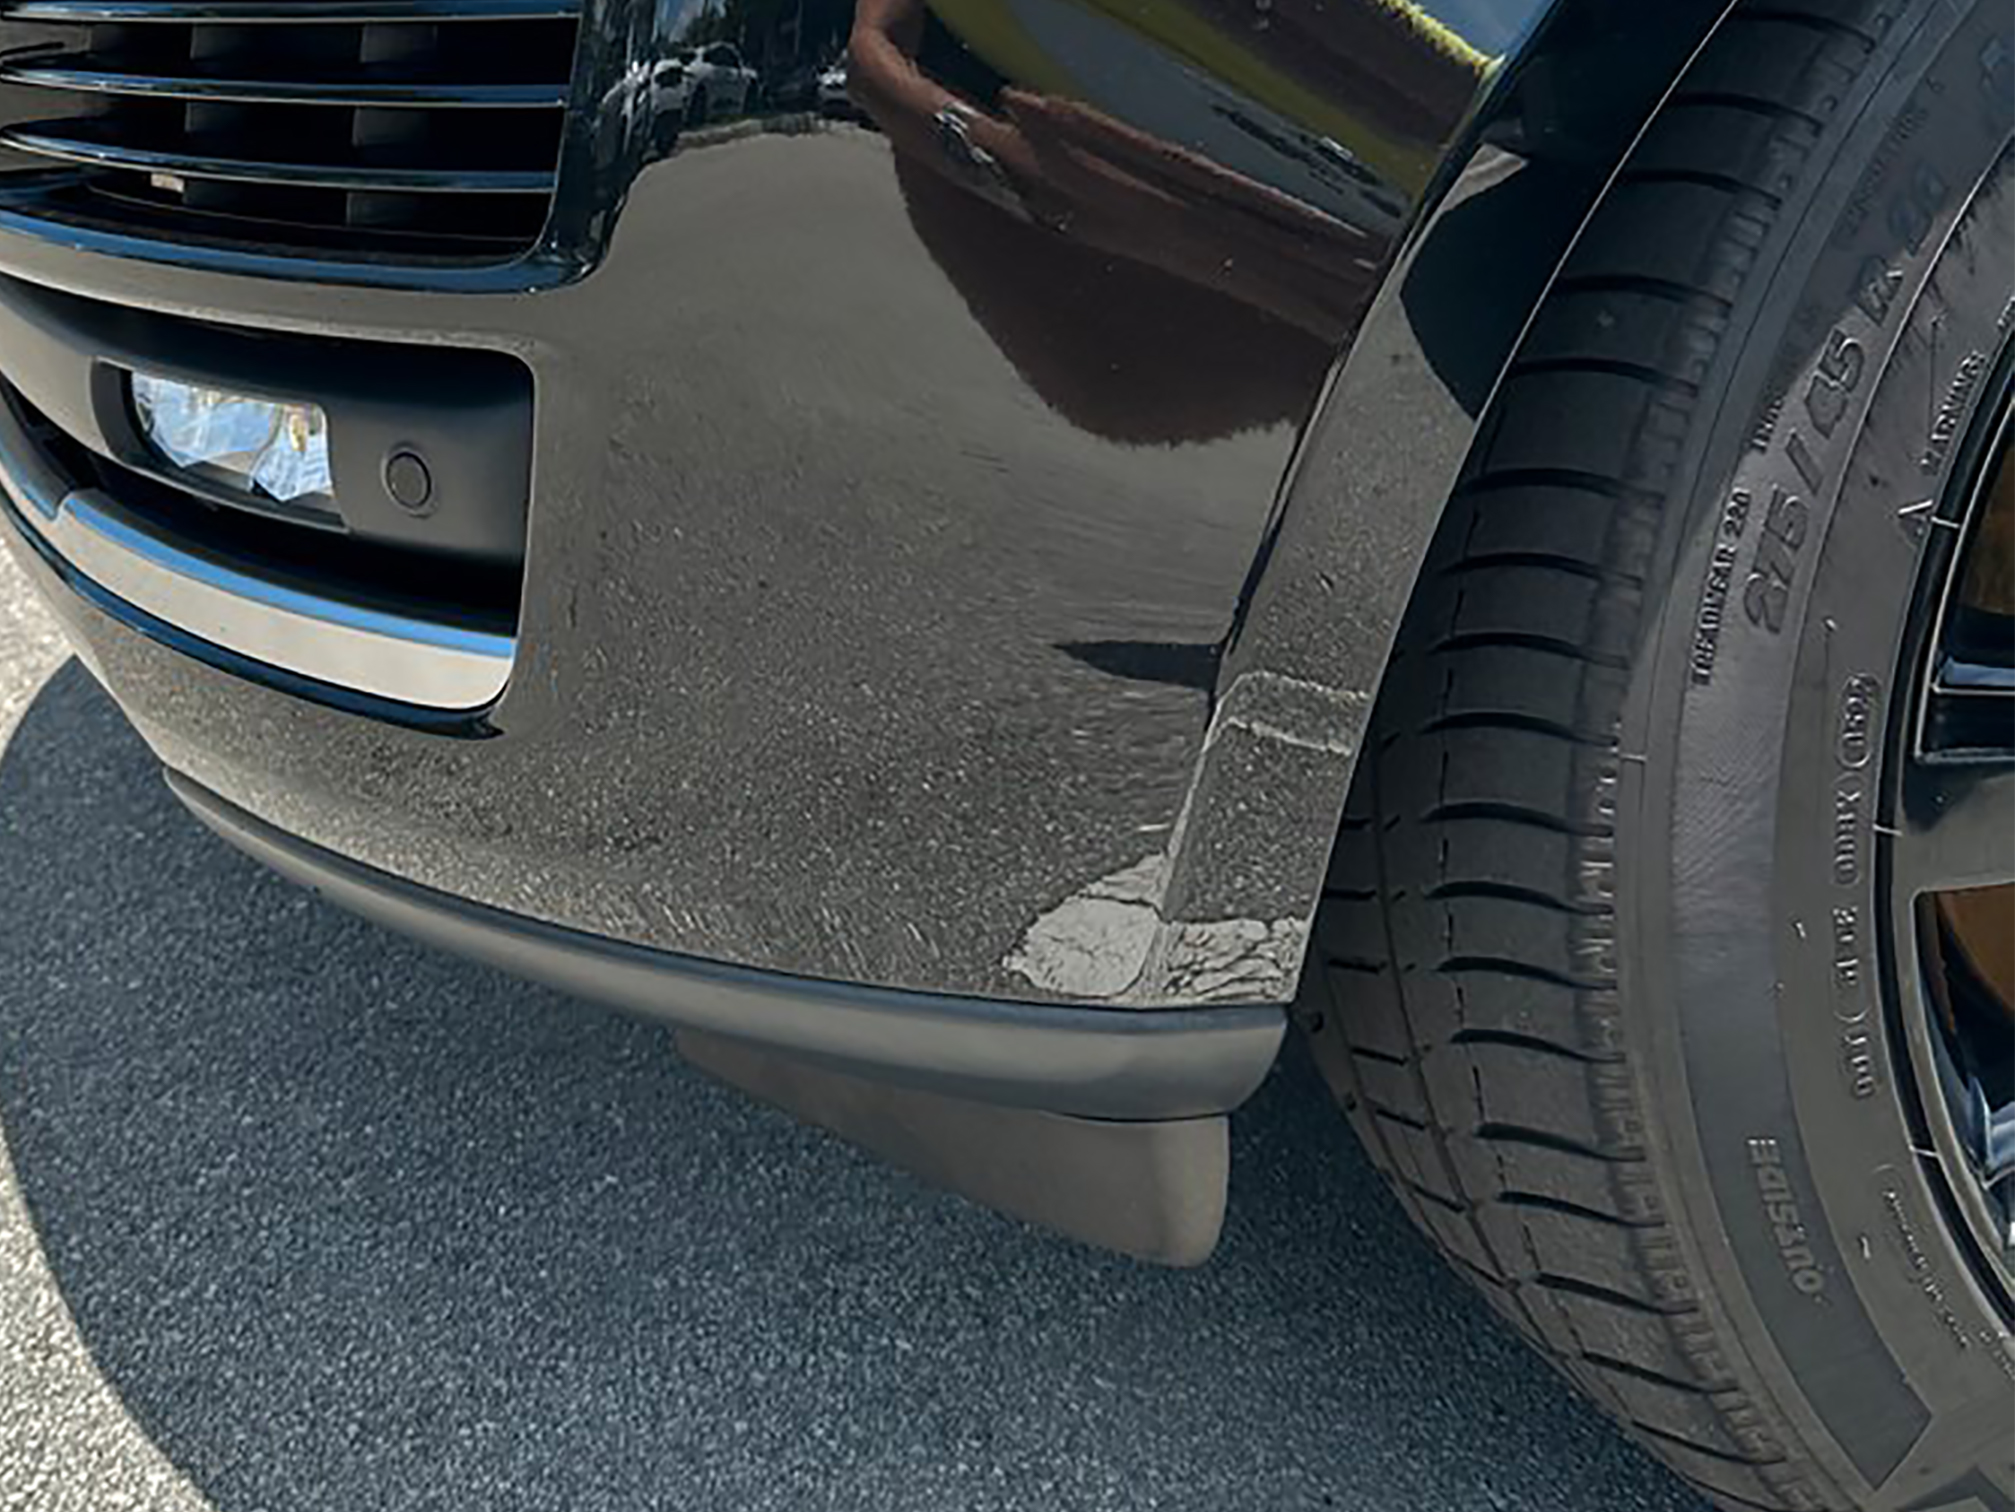
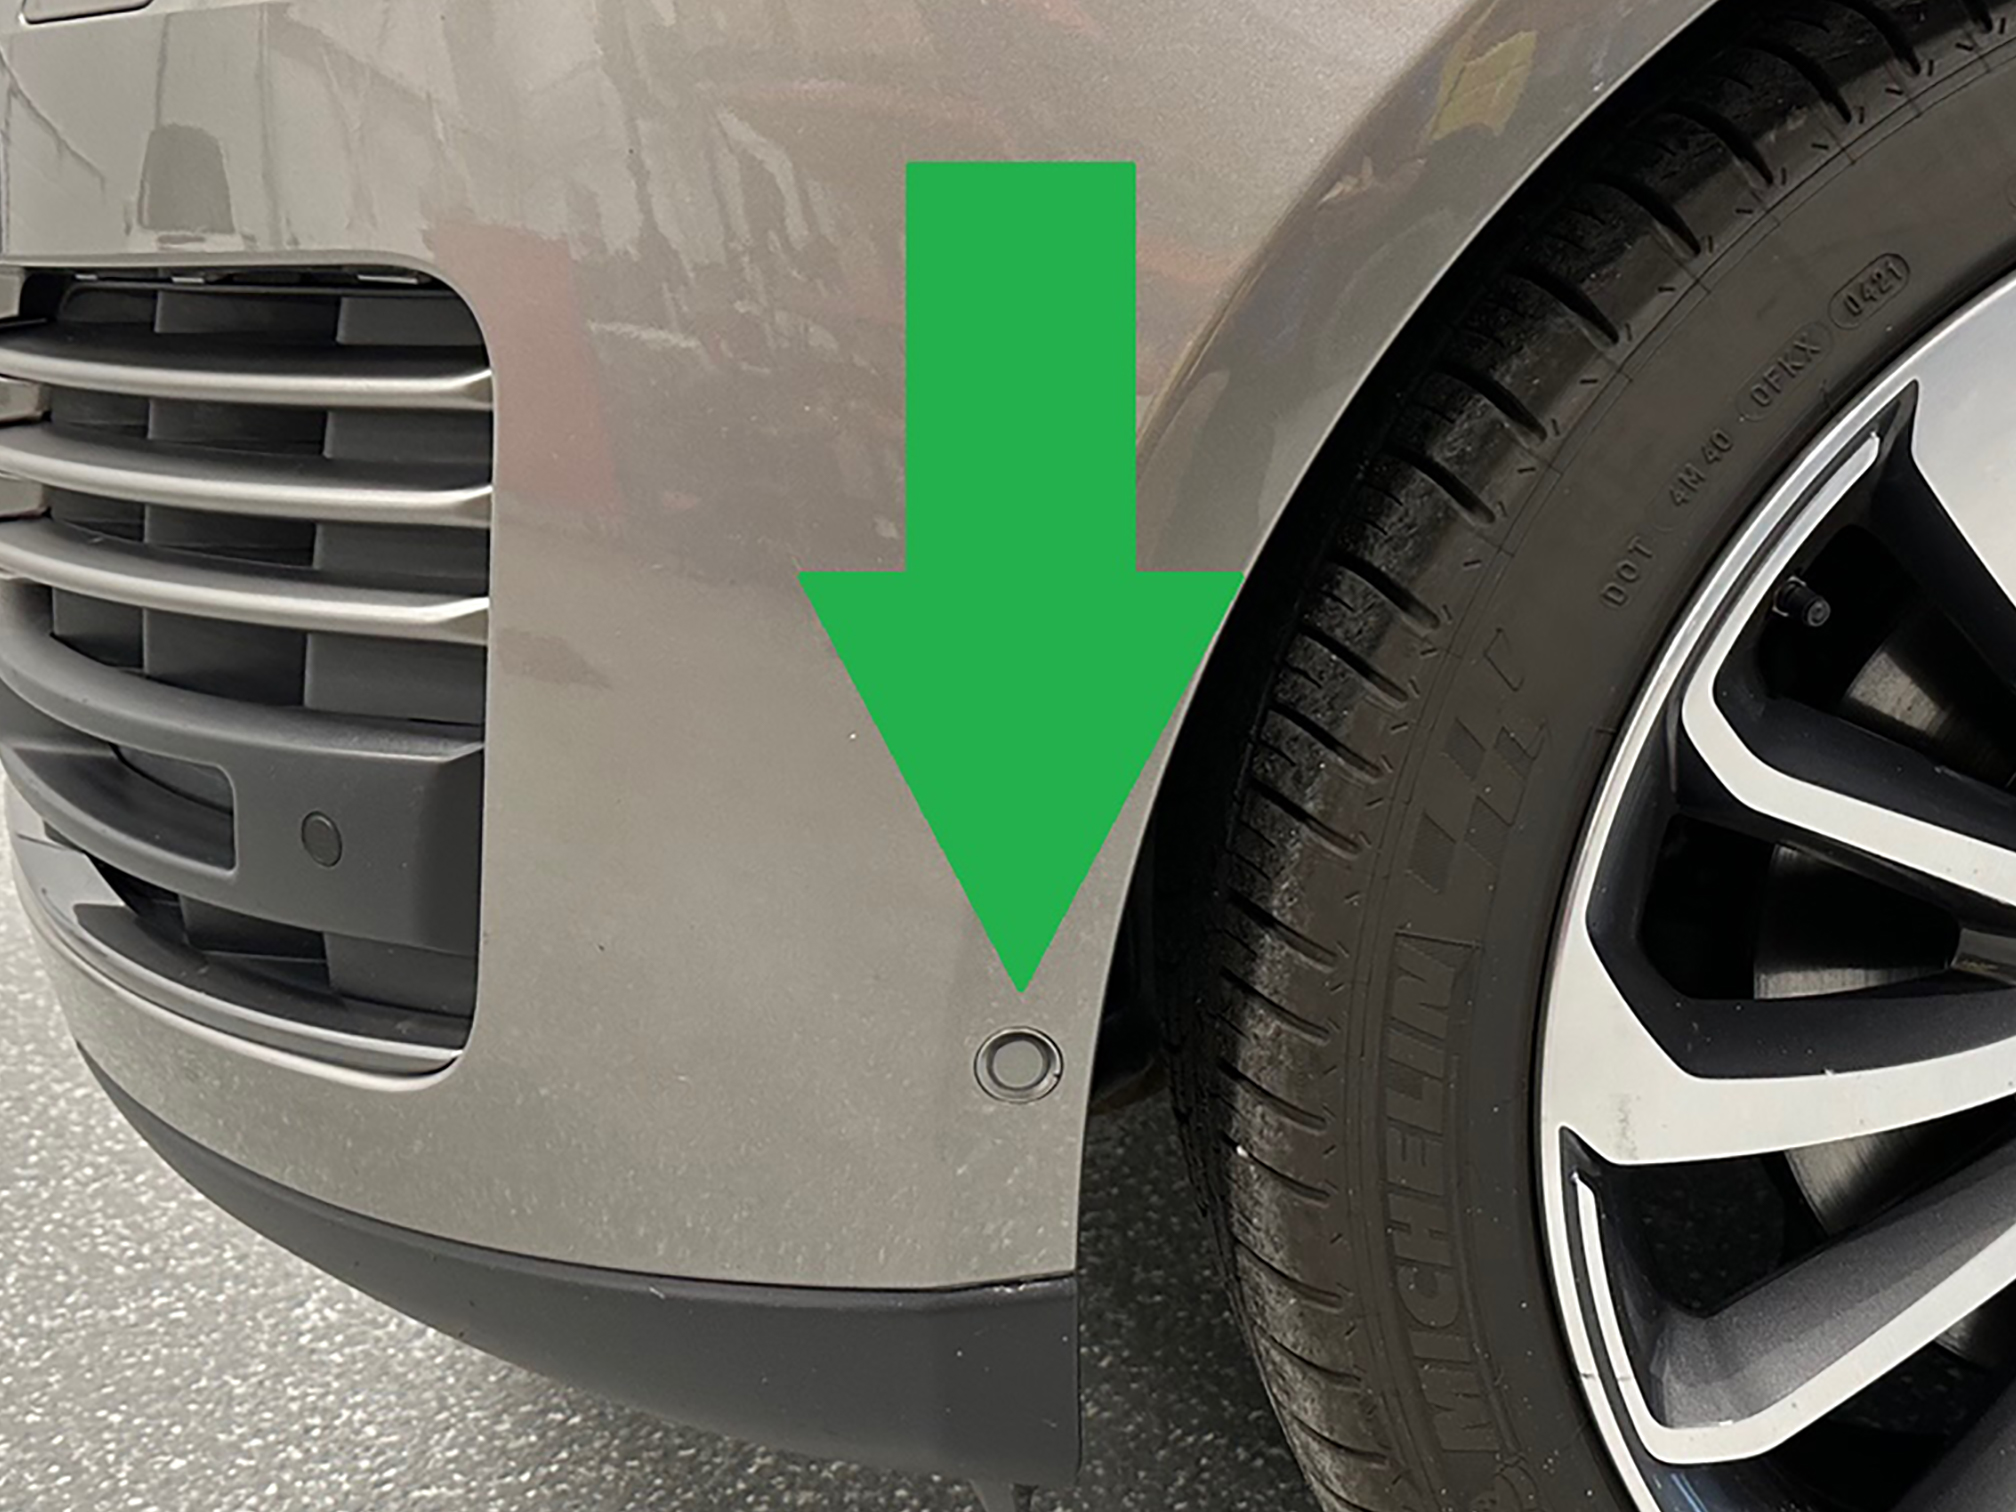
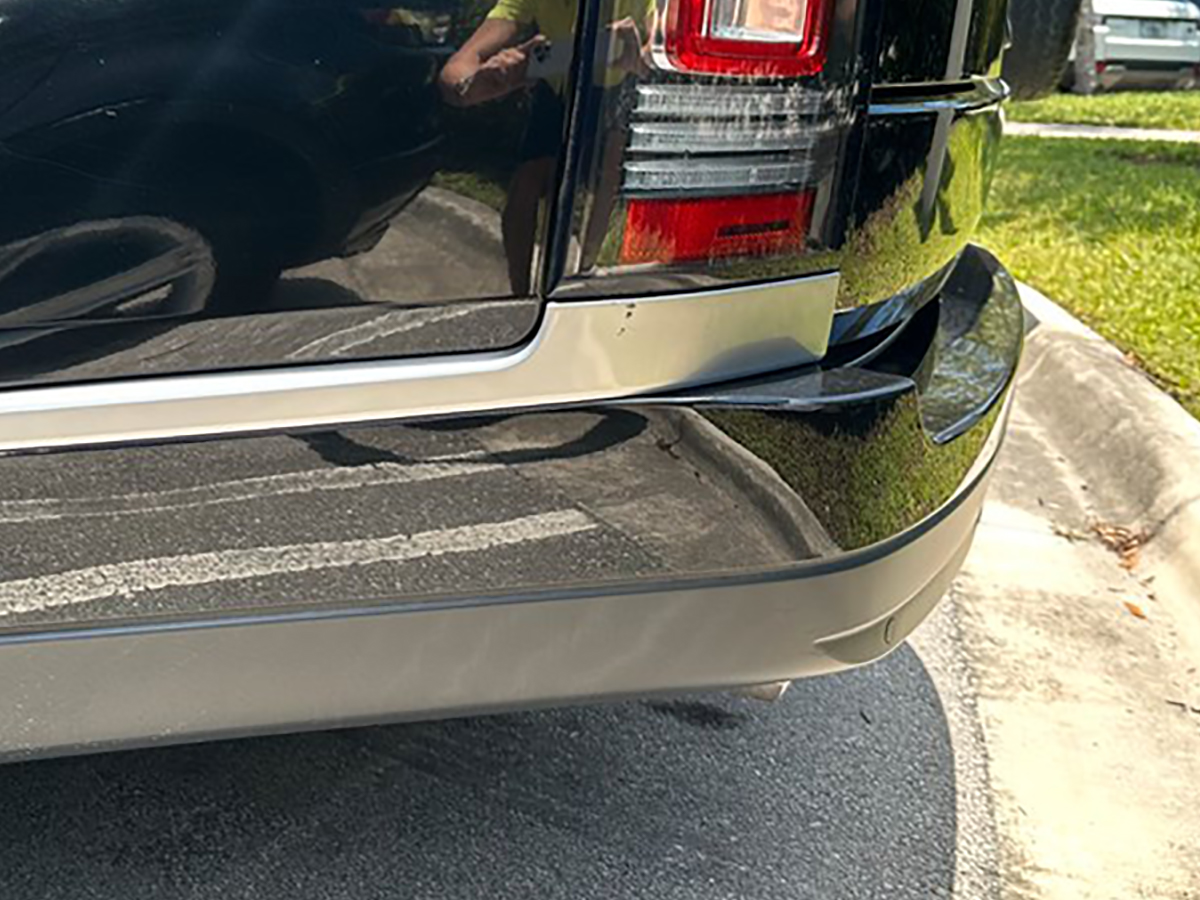
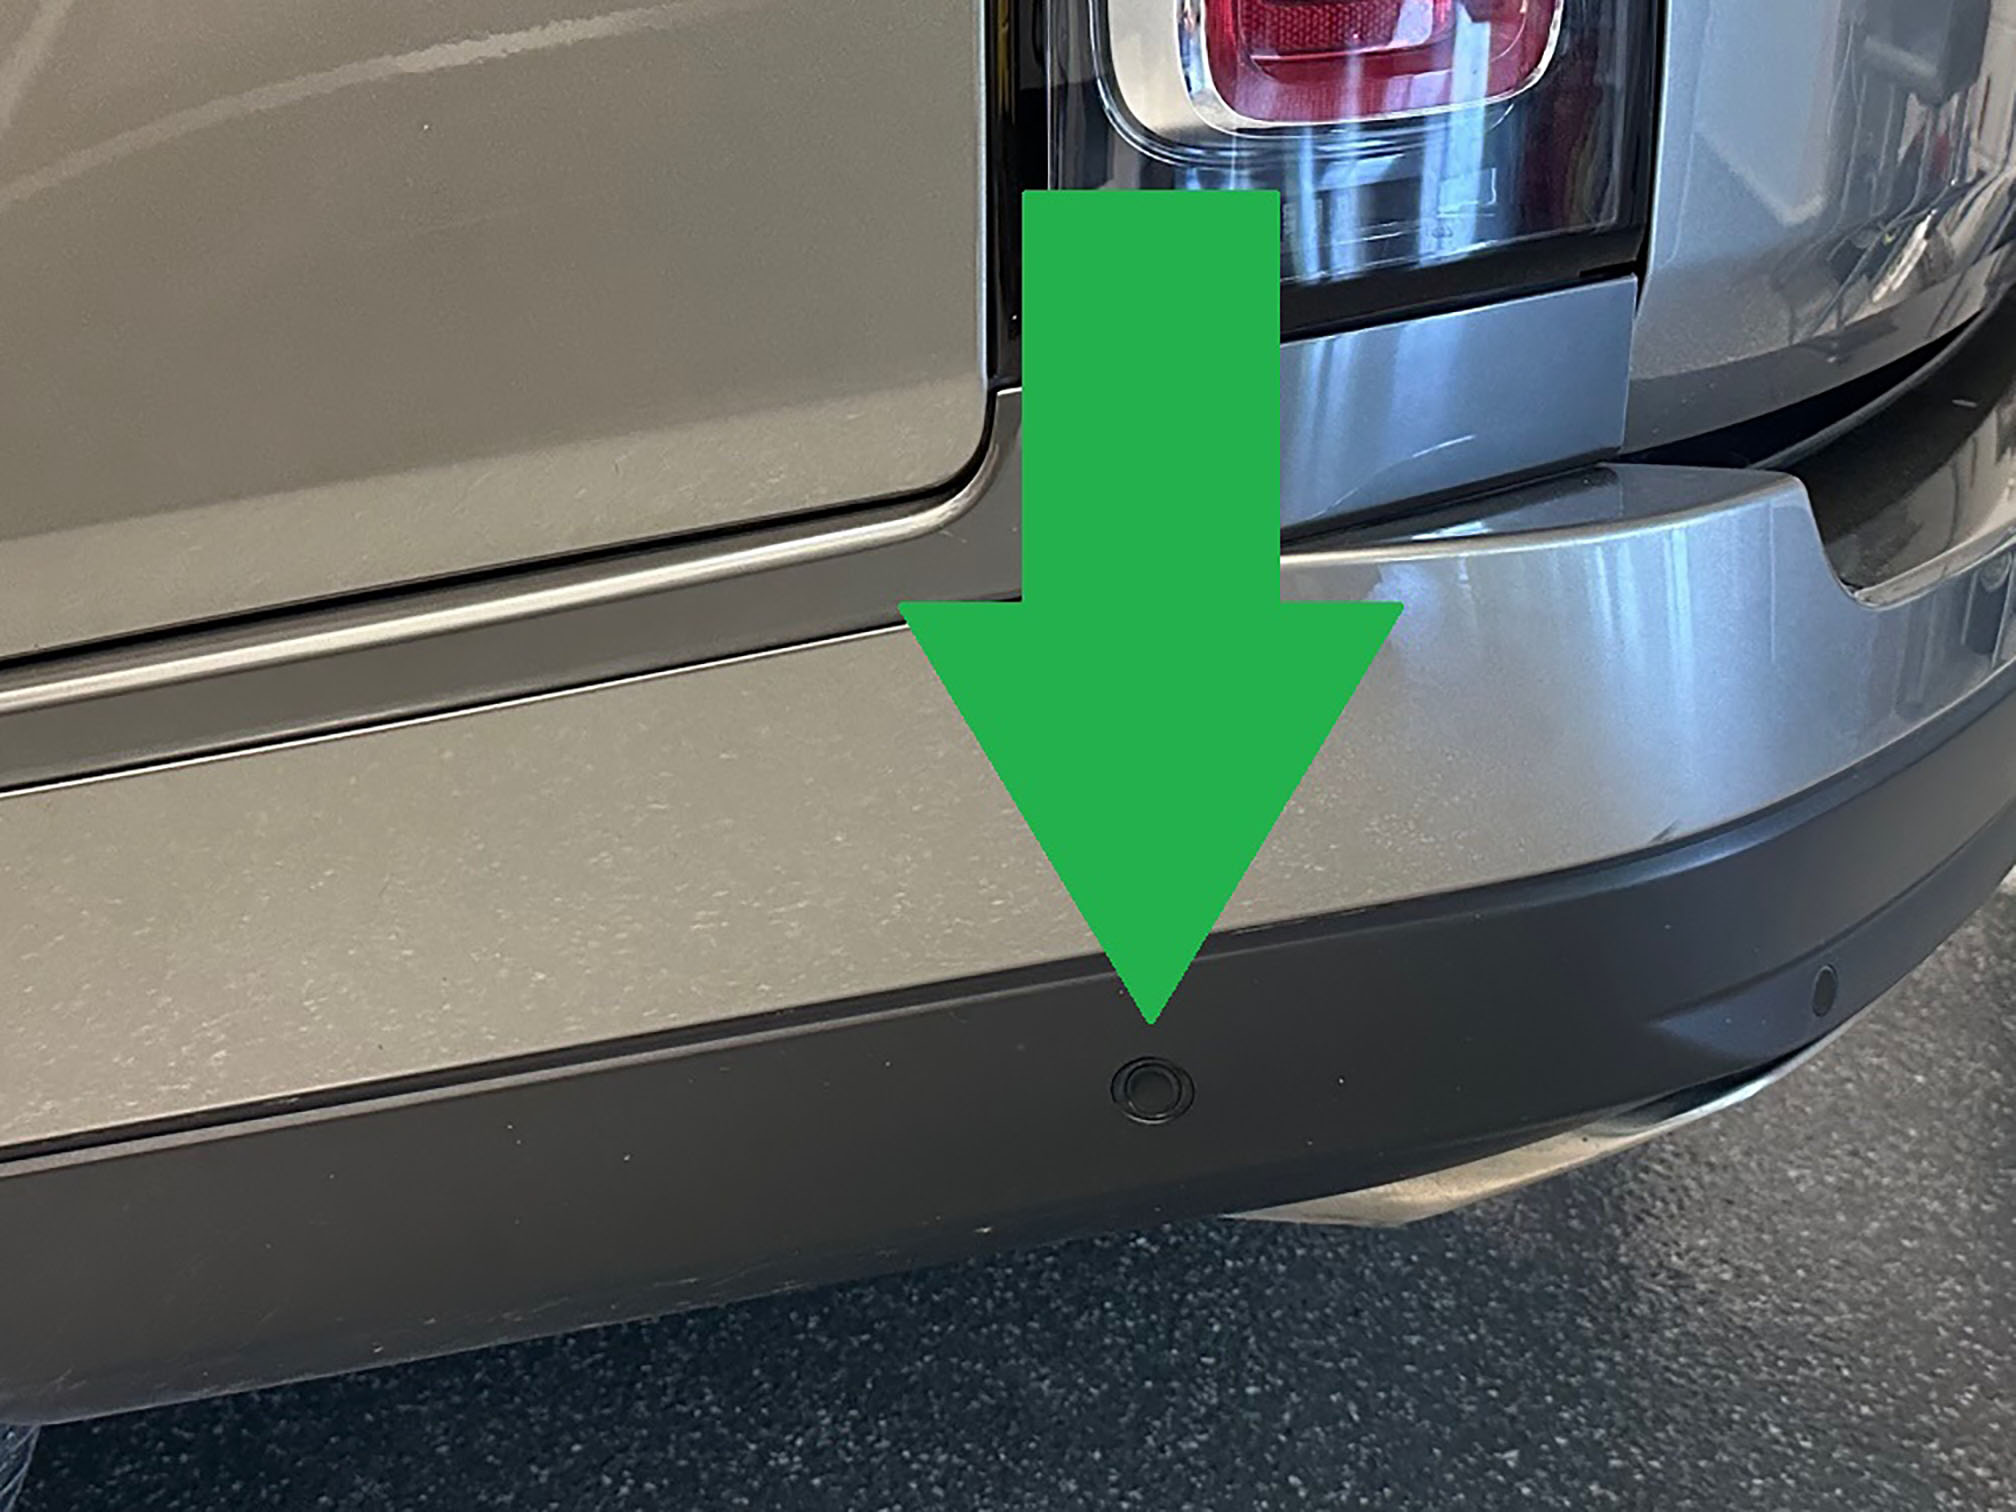
This is to enable parallel and perpendicular parking assistance. Part of the Parking Aid system, it uses additional sensors. Not all model year support perpendicular assist.
-Verify that the Park Assist Sensors are installed on the vehicle. There are two in the front bumper and two in the rear bumper. Total of the PAM system with Park Assist is 12 sensors.
For example, the Black vehicle does not have Park Assist Sensors while the Grey one has them.
L494, L405 2014 to 2016
-CCF changes required, Menu–Car Config–Complete List*
- T5-042 Pdc 10 Channel fitted ( Park Assist)
- EUCD-059 Parking Assistance PDC (360) – Parking (Parallel, Perpendicular, Exit)
- MultiCAN-469 PDCAutoActivation – Default off configurable
-Menu–Service/Test -> PAM-Parking Aid -> CCF Relearn
-Menu–Service/Test–IPMA-Image Processing Module ‘A’–Allow Central Configuration Data Learning
-Menu–Service/Test–IMC-Infotainment Master Controller–CCF Relearn
*Pre-2017, please contact us if access to the complete CCF has not yet been granted
2017+ (under development)
-CCF changes required, Menu–Car Config–Complete List*
- T5-042 Pdc 10 Channel fitted ( Park Assist) (0x4)
- EUCD-026 Power Steering Type – Electric Power Steering with external angle and torque control , only for JLR (may be required)
- EUCD-059 Parking Assistance PDC (360) – Parking (Parallel, Perpendicular, Exit)
- EUCD-140 Pdcautoactivationmenu With PDC Auto Activation menu
- MultiCAN-469 PDCAutoActivation Default OFF configurable
- MultiCAN-602 PDC 10 Channel fitted ( Park Assist)
-Menu–Service/Test -> PAM-Parking Aid -> Reset CCF Learn
-Menu–Service/Test–IPMA-Image Processing Module ‘A’–Allow Central Configuration Data Learning
-Menu–Service/Test–IMC-Infotainment Master Controller–CCF Relearn
The following setting needs to be changed;
Menu–Car Config–Complete List
Radio, amp and speaker system, set it to Premium audio system
L405 L494 up to 2016
Menu–Car Config–Complete List;
Dynamic button = Fitted
L663
Menu–Car Config–Complete List;
-EUCD-129 Terrain Response Fitment = Auto Terrain Response Dynamic & Configurable Dynamic Mode
-MultiCAN-562 DynamicProgMode = Available for selection without timeout
-EUCD-245 Dynamic-I = Dynamic-i Content with Configurable Dynamic Mode Screen
Menu–Service Test–IDMA Interactive Display Module A–Allow Central Configuration Data Learning
Only a brand new ECU purchased from Land Rover can be fitted. Used units cannot be installed.
– Replace Module
– ECU Info, Check Latest Firmware 7H32-14C184-AA and reflash if needed
– Contact us and as for BCM replacement AsBuilt
– Program Keys with special build (contact us)
– Steering Column Calibration if fitted with
On some platforms, 2016+, the service reset may not work. Please contact us for assistance.
On L550 Discovery Sport for example, an update of the IPC Instrument Pack ECU may be required.
Always try the manual method first on 2017+ vehicles;
- Open the bonnet (hood) and close all doors
- Place the ignition to the ON position without starting the engine
Press the START/STOP button once without pressing the brake pedal
- Open the driver’s door
- Fully depress and hold the BRAKE and GAS pedals for 30 seconds
The “Service Resetting” message will appears in the display
- Turn off the ignition
Press the ENGINE START/STOP button once
- Verify the indicator has been reset by starting the engine
Validated on a 2023
Menu–Car Config–Complete List;
- MultiCAN-636 AdaptDrvBeam set to AdaptDrvBeam Enabled
- MultiCAN-679 HeadlightsVariant set to Headlamp_Variant_High_A
- MultiCAN-674 AFS123 set to AFS123 Enabled
This item is under development. Details will be added as knowledge on the subject increases.
Range Rover L322 2010 to 2012 and Rover Rover Sport L320 2010 to 2013;
Install the correct parts (radar, switches) taken from a vehicle of the same model year and platform. Prior to reinstalling the bumper cover, proceed with the Radar vertical position adjustment procedure defined at the end of this topic.
The Car Configuration File needs to be changed accordingly. Menu–Car Config–Body Control;
- Cruise Control: Adaptive Fitted
- Cruise Control Display: Adaptive speed control full display plus priority messages
- JAG Cruise Control: ACC*
Update the IIDTool firmware to the latest firmware and call the calibration function using the tool connected to the car; Menu–Calibration…
The calibration will take some driving to complete. See below for details.
*Later cars can be set to ACC_Queu or similar. If the cruise control does not work at ACC_Queu, revert back to ACC as the firmware does not support it thus disables the cruise control.
Range Rover L405 2013 to 2016 and Rover Rover Sport L494 2014 to 2016;
The following thread is of interest for these platforms;
Install the correct parts (radar, switches) taken from a vehicle of the same model year and platform. The Jaguar radar will work once reflashed. We do not however have a list of which sensor will work cross vehicle platform. This part number, GX73-9G768-AD from a Jag will work on a 2016 Land Rover. Prior to reinstalling the bumper cover, proceed with the Radar vertical position adjustment procedure defined at the end of this topic.
The Car Configuration File needs to be changed accordingly. Menu–Car Config–Complete list, use the search box*.
Do not change any of the following settings to other values. No other combination will work, even if you select another value for the region setting, North America, Canada, Mexico, Australia is the only way for this to work.
- Speed Control: Adaptive speed control is fitted
- Adaptive Speed Control ECU: North America, Canada, Mexico, Australia
- Adaptive Speed Control ECU: Standard blockage level -40dB
- Collision Mitigation By Braking: Fitted
- Standard Speed Control Display Type: Adaptive speed control full display plus priority messages
- Speed Control: Adaptive speed control with queue assist
- Adaptive Cruise Control Indication In Instrument Cluster: Enabled
- Speed Control: Adaptive speed control, stop and go
- Collision Mitigation By Braking: Collision mitigation by braking GEN 3
- Forward Collision Warning: Forward collision warning GEN 3
- Front Crash Sensing System: Front crash sensing system – Upfront sensor
Update the IIDTool firmware to the latest firmware and call the calibration function using the tool connected to the car; Menu–Calibration…
The calibration will take some driving to complete. See below for details.
**CCF Full access (complete list) is required and available upon request.
Discovery 4/LR4 L319 2015-2016*
Install the correct parts (radar, switches) taken from a vehicle of the same model year and platform. Prior to reinstalling the bumper cover, proceed with the Radar vertical position adjustment procedure defined at the end of this topic.
This part number, FPLA-9G768-AC will work. Others may also work after reflash.
2015+, the Car Configuration File needs to be changed accordingly. Menu–Car Config–Complete list, use the search box*;
- Adaptive speed control ECU: Standard blockage level -40bd
- Speed Control: Adaptive Fitted
- Standard speed control display type: Adaptive speed control full display plus priority messages
- Speed control: ACC or Adaptive Speed Control on some cases
- Speed control: Adaptive speed control, stop and go
- Forward collision warning: Forward collision warning GEN 1
Update the IIDTool firmware to the latest firmware and call the calibration function using the tool connected to the car; Menu–Calibration…
The calibration will take some driving to complete. See below for details.
*The ACC was available for the L320 2010-2013 but only from 2015 on the L319. It may work on earlier L319 since they are the same platform electrically wise than a L320 but this still needs to be confirmed. On earlier model years, the settings would be the same as on the L322 above.
**CCF Full access (complete list) is required and available upon request.
2017+ (Draft, to be confirmed)
- Powertrain Elements 1 – Cruise: ACC Fitted
- Powertrain Elements 2 – Jaguar Cruise Fitment: ACC with Queu Assist Fitted
- Cruise Control: Adaptive Cruise Control Stop & Go
- IntelCruiseCtrl: ICC Not Fitted
- PTCruiseFitment: ACC with Queu Assist Fitted
Radar Vertical Position Adjustment, All except L460, L461 L663 and L538 2018+
The CCM ECU has a vertical mechanical adjustment. No horizontal adjustment exist. Prior to reinstalling the bumper cover, proceed with the following;
- Make sure the vehicle is on a level surface
- Place an inclinometer or equivalent device (mobile phone App may work) to measure vertical alignment.
- If necessary, adjust the torx screw until the sensor is leveled (+/-0.5 degrees)
Calibration process, All
Menu–Calibration–CCM Cruise Control Module
The service alignment process measures the path of stationary targets such as streetlamps, railings, road signs parked vehicles etc., and uses this data to correct for radar misalignment:
- Alignment will complete more quickly if more suitable targets are seen.
- The speed must be above 30mph (48kph).
- Choose a road with plenty of obstacles.
- Choose an inside or outside lane.
- Following vehicles too closely will obscure the stationary targets from the radar, a time gap of 2 seconds is recommended.
- A straighter road will produce a quicker and better result, although the process will still operate on a curved road.
- The time the module takes to align will vary, depending on the route, speed, number of targets, and individual module.
- When the flashing ‘follow icon’ lamp extinguishes, the system is correctly aligned.
To be fully functional the following process needs to be carried out:
- Stop the vehicle at the next available opportunity.
- Turn the ignition off and wait 15 seconds.
- Start the engine, once 15 seconds have elapsed.
- The adaptive speed system should now be fully functional and the user can now set a desired speed, allowing the adaptive speed control to operate as normal.
The issue is caused by an update on Windows 10 and 11. We are currently investigating as of 2022-07-15 and will provide a solution shortly.
Updater software, Windows install and usage issues
- For computers running Windows, except Windows 10 and up, click the right mouse button and select “run as administrator”.
- For computers running Windows 10 and up, make sure to have administrator rights. Usage of an administrator account is required. Search on Google for how to enable it.
- Some antivirus may block the updater installation. Disable it temporarily if in doubt.
- Make sure to allow the updater software internet access in your firewall settings.
Several tasks performed with the IIDTool can be done with the engine running (outside). There is no risk of discharging the battery in this case. However, if a task requires the engine to be stopped; the following message will appear:
For all vehicles 2010 and + “The engine will automatically shut down.”
For all other vehicles: “The engine is running, stop the engine and turn the ignition” (position II).
The IIDTool can be used for several operations without starting the engine. Thus some short tasks can be performed in an indoor environment such as a garage.
However, if the duration of the tasks performed without the possibility of starting the vehicle (that is to say in a closed environment), is estimated at more than 10 minutes *, there is a risk of discharging the car battery.
*(Indicative only and will vary according to the battery state).
-If the function permits, start the engine
-Use a power supply connected to the vehicle’s battery (type Midtronic PSC-550, CTEK or equivalent)
-Use another car with its engine running and jumper cables.
CAUTION: Battery chargers are to be avoided due to poor line regulation.
We use PayPal for all payment method. They do offer financing in up to 4 instalments with no interest when paying with your PayPal account.*
*Some conditions may apply and financing may not be offered in all countries. We have no control over these conditions or availability.
First, check for faults. Fuel Prime or Check Operation functions may be required after a long period of inactivity.
Only partial diagnosis of the AHCM / FBH was implemented by Land Rover thus available via the OBD port. The Webasto Thermo Test Software grants access to further functionalities and is connected directly to the unit. More details here;
https://disco3.co.uk/wiki/Fuel_Burning_Heater
Used electric power steering can be installed. It will have to be taken from a vehicle of the same year. Other model years have proven not to be installed.
Upon first use or after an update of its firmware, the IIDTool will scan the communication buses and note which ECUs are responding. The resulting list is stored in the IIDTool memory.
This process needs to be performed with ignition ON or engine running. Failure to do so will result in missing ECUs in the tool list.
To avoid this, always connect the tool with ignition ON or engine running.
To fix this,
-Start the car
-Connect the tool
-Menu–IIDTool Config–Find ECUs
If a new ECU is installed or removed from the vehicle, the Find ECU function shall be used to add or remove the ECU from the list.
CCF changes are required. Access to the complete CCF is required and available upon request. The AFS ECU or its fuse may also need to be removed or disconnected.
2006-2009 L322
Menu–Car Config–Instrument Pack–Adaptive front lighting system = Fitted OR Not Fitted
2004-2009 D3/LR3 and RRS
Menu–Car Config–Body Control–Adaptive front lighting system = Fitted OR Not Fitted
2010+
This is done in the CCF. Access to the complete CCF is required and available upon request.
Menu–Car Config–Complete List;
-Adaptive front lighting system = Fitted OR Not fitted
-Headlights, type = Advanced front lighting system with adjuster OR Gas discharge lights with auto adjuster
On L405 and L494 up to 2016
EUCD-014 Headlights, Type = The correct one fitted on the car.
Some hardware version do not have a custom firmware for ECU Flashing. Instead, another button will be visible in the updater software called ”Program Flash Files Only”. These are typical instructions;
-Connect the IIDTool to your computer USB port
-Start the updater software
-Click ”Find Device”
Select ”Custom Build 2769” and Click on ”Program Firmware”
OR Click on ”Program Flash File Only” if the button is available (hardware dependent)
-Wait until completion
-Follow the instructions on screen in regards to the mobile App file loading.
In your vehicle (in this order):
-Menu->ECU Flash…
When pressing on the send email button, nothing happens, no email is mounted.
The mobile device needs to have an email account set in the native Mail App. Third party App like outlook, aol and the likes do not support such export functions.
Apple, the App is called Mail:
https://support.apple.com/en-ca/HT201320
Android, the App is called GMail:
https://support.google.com/mail/answer/6078445?hl=en&co=GENIE.Platform%3DAndroid
2.4L Engine ECU replacement
1- The ECU will need reflashing via fast lane for the BT (free for Pro users). Instructions are in RED:
https://www.gap-diagnostic.com/shop/fast-lane-service/
2- Menu–Service Test–Engine, in this order:
-Injector Replacement
-Fuel Lift Pump Reset
-Renew security ID between 10AS and PCM
-High PSI Pump Reset (this must be completed and a success before doing the Pilot Correction Learning)
-Pilot Correction Learning
2.2L Engine ECU replacement
1- The ECU will need reflashing via fast lane for the BT (free for Pro users). Instructions are in RED:
https://www.gap-diagnostic.com/shop/fast-lane-service/
2- Menu–Service Test–Engine, in this order:
-Learn 10AS Security ID
-Fuel Lift Pump Reset
-Injector Replacement
-Turbo Replacement
-Reset Oil Counter (change engine oil!)
-Mass Air Flow Repl. Reset
-DPF Filter Replacement when replacing
-DPF Pressure Sensor Reset
-Clear Adaption Values
3.6L TDV8 Engine ECU replacement
1- The ECU will need reflashing via fast lane for the BT (free for Pro users). Instructions are in RED:
https://www.gap-diagnostic.com/shop/fast-lane-service/
2- Menu–Car Config, in this order:
-Change a non significant setting and write the CCF
-Revert back the changed setting and write the CCF again
This is to write the CCF in the engine ECU
3- Menu–Service Test–Engine, in this order:
-Renew Security ID
-Fuel Lift Pump Reset
2004-2009
In this order,
-Physically disconnect the Active Roll ECU, A pillar, driver side
-Menu–IIDTool Config–Find ECUs
-Menu–Faults–Show All ECUs, locate the Active Roll ECU, it needs to say ”Not Fitted”. If not, the Active Roll ECU was not disconnected, locate the correct ECU and repeat previous steps
-Change the CCF to disable the ARC, Menu–Car Config…
Dynamic response module = Not fitted
-Reflash the suspension, Menu–ECU Flash–Suspension, select the proper file for your car. Use the Identify function if unsure which compressor firmware is fitted (AMK or Hitachi)
2010+
-Contact us and ask for the Complete CCF list
-Change the following settings:
Dynamic response module = Not fitted
Dynamic button = Not fitted*
-Please send us your ECU Info list and ask for ARC removal file. No screenshot please.
ECU Info video example
-Once the file is provided, reflash the suspension, Menu–ECU Flash–Suspension
*These may not be mandatory for faults to be non present.
This item is under development. Details will be added as knowledge on the subject increases.
L319 2010 to 2016, L322 2010 to 2012 and L320 2010 to 2013
These vehicles can only have the Automatic High Beam Assist retrofitted. The proper rear view mirror located on the top of the windshield needs to be installed. The Car Configuration File needs to be changed accordingly;
Menu–Car Config–Body Control;
- Auto high beam 1
Fitted - Auto high beam 2
Enabled - Auto high beam 3
North America*
*This setting may be changed to the desired value. The difference between each value behaviour has not been confirmed and some may not work.
L494 2014 to 2016, L405 2013-2015 and L538 2012 to 2015
These vehicles can have Automatic High Beam Assist or Automatic High Beam Assist, Traffic Sign Recognition (TSR) and Lane Departure Warning (LDW). The proper rear view mirror located on the top of the windshield needs to be installed.
- Low line rear view mirror with no features
- Mid line rear view mirror only has AHBA
- High line rear view mirror will support AHBA, TSR and LWD
It will be named HCMB in ECU Info.
Also the LDW switch needs installing.
Rear View Mirror Hardware for L405 and L494 up to 2015;
- Mid line DPLA-17E678-Ax, Bx or Cx
- High line DPLA-17E678-Hx (North America) or Gx (rest of the world)
- High line DK52-17E678-GB as been proven to work also
This hardware is from the L405 and is much easier to find than the hardware for the L494. When new hardware numbers are known, they will be added to this list. Re-flashing is required when installing the L405 hardware on a L494. It will be named HCMB in ECU Info.
Rear View Mirror Hardware for L538 up to 2015;
- EJ32-17E678-BB – this is the auto high beam assist, auto dimming mirror with homelink buttons.
- EJ32-17E678-AB – this would be the one without homelink buttons.
- EJ32-17E678-JA – this would have AHBA, TSR and LDW (to be confirmed)
Others may work but the part number must not start with G as this would indicate build year 2016 which does not work on earlier cars. It will be named HCMB in ECU Info.
Changing the Car Configuration File (CCF)
The Car Configuration File needs to be changed accordingly. Menu–Car Config–Complete list, use the search box for
- Auto High Beam = Fitted
- Auto High Beam = Rest of World
- Lane Departure Warning = set to the desired value, LANE_WARN_TSR**
- Power steering type = Electric power steering with external angle and torque control***
*Some features may not work on 2013 model year.
**CCF Full access (complete list) is required and available upon request.
***CCF full access required. This setting is to enable steering vibration when LDW is triggered.
Rear View Mirror Hardware and CCF change for L405, L494 and L538 2016;
The mirror changed in 2016 thus earlier ones cannot be used. Part number are currently unknown but will be added once confirmed. It will be named IPAM in ECU Info.
CCF changes are similar.
Rear View Mirror Calibration;
This is only required for brand new mirrors. Used ones may need a few drive cycles to be functional.
L405, L494, L462 2017 to 2019 and L538, L550 2018-2019
Menu–Car Config–Complete List;
Auto High Beam Assist
Auto High Beam – Sensitivity Menu -> Enabled
Auto High Beam – System Status AHB -> AHB Fitted
– Run routine : IIDTool Menu -> Service/Test -> IPMA-Image Processing Module ‘A’ -> Allow Central Configuratin Data Learning
Lane Departure Warning and Lane Keep Assist
-EUCD-098 Lane Departure Warning = LDW Fitted with Enable Menu & TSR Fitted with Overspeed
-MultiCAN-498 LaneKeepAssistLKA = LKA fitted
-EUCD-026 Power Steering Type = Electric Power Steering with external angle and torque control , only for JLR
– Run routine : IIDTool Menu -> Service/Test -> IPMA-Image Processing Module ‘A’ -> Allow Central Configuratin Data Learning
The mobile device needs to be restarted.
Verify that you have selected the Release firmware and not the Nav On Move special firmware. On 2010+ vehicles, the Nav On Move firmware will not work hence the Vehicle No Supported message.
Updating the tool to the Release Build fixes this.
This is caused by a bad or non existent internet connection.
On Discovery 3/LR3 and Range Rover Sport 2004-2006, the Body Control unit needs updating. Prior to updating this ECU, please consult the user manual since damages to rear latches can occur if proper precautions are not taken.
This is granted upon request. Simply use our contact form on this website.
Unfortunately, we are not in a position to offer discounts nor coupons.
Updating the transmission will help is many cases but there is always a risk when working on a transmission.
First, the warnings:
The clear adaption routine may cause the transmission to behave erratically over a period of time. It will need a few drive cycles to get back to normal. Drive the vehicle normally and make sure that the transmission shifts all gears.
Clearing adaption shall only be performed if an oil change, firmware reflash or if the transmission was repaired. Clearing adaption for no reasons on a transmission that is working correctly may worsen its behavior. In fact any non needed work made on a transmission that is working correctly may worsen its behavior.
If you accept the risks, simply purchase the fast lane, (no purchase required for IIDTool Pro owners), send us the complete ECU Info and we will send you further instructions.
Unless there is an issue to fix with the car, we suggest leaving ECUs alone. Else, we can provide them on an individual basis via the fast lane service*
Also, the tool already has some embedded in it (vehicle dependent). Please consult the user manual for more details.
*No charge for IIDTool Pro owners
Make sure that the following are enabled;
-WiFi
-Bluetooth
-GPS
-All IIDControl app permissions
Also, never try to pair the unit, the App takes care of the connection. Unpair or disconnect from any other Bluetooth devices from the phone when using the IIDTool.
*Some mobile device have an all in one GPS, Bluetooth and WiFi chip. All must be enabled even if the IIDTool does not use the GPS.
For these vehicles, only a brand new key will work. Used key programming is not possible. Cheap Chinese keys rarely work thus it is suggested to purchase from a reputable location or a Land Rover dealership.
The tool key programming algorithms have proven reliable thus its always key related.
Some KVM ECUs are locked and need some special operations. In which case, please send us your complete ECU Info list as per this video. No screenshot please.
Remote key plips frequency will vary depending on market.
-433 MHz Europe, Asia, Oceania, UK, UAE and more
-315 MHz America, rest of the world
Make sure to order the correct key for your car/market
You can purchase an IIDTool from our webshop based in Canada
From any AllMakes4x4 dealer
Bell Auto Services is also a good place for UK based customers.
These earlier units firmwares are platform specific. A unit made for a Discovery 3 cannot be used on a Range Rover L322.
The firmware can, however, be changed to the desired platform when transferring a unit. One cannot change the firmware platform unless a transfer of ownership is purchased.
The following is our licence policy:
Full diagnostic capabilities (free of charge on any supported vehicles for the IIDTool BT and IIDTool Pro)
• Fault read / clear
• Live values
• Control outputs
• Service / test functions (this includes service interval reset)
Advanced programming functions (IIDTool BT: one free VIN, additional licence available. Fully unlocked for the IIDTool Pro):
• Suspension height modification
• ECU Flash*
• Key Programming*
• Car Configuration File editing.
• Component and system calibration (steering angle sensor calibration, etc.)
• Advanced functions including backup / restore, save profiles – vehicle system settings and
configurations are read and stored as a backup file for a restore function, various changes
to systems (e.g. suspension height) can be stored and changed quickly
*Vehicle dependent, please consult the user manual for more details.
If needed, additional licenses are found here.
Please consult the functionality table found on the IIDTool product page;
And the user manual located in the document section.
Simply follow the instructions found in this Video or for more details, in the transfer of ownership guide.
For Discovery 3 2004-2009 and Range Rover Sport 2005-2009
Menu–Car Config–Instrument Pack–Tyre Radius
For 2010+ vehicles
Only one of the following settings will work and it depends on the car itself. Menu–Car Config–Instrument Pack–
This setting, Tyre Size MSB – IPC
Or this one, Tyre Rolling Radius (mm) – ABS
2010 to 2016 except L494 and L405
In the Body Control ECU, Car Config Function
– Towbar -> With Trailer Tow Attachment
– Trailer module -> select the correct one
– TowingAero -> Fitted (tow assist will only work if surround cameras are fitted)
– Towing – Tow Ball -> Fitted
L494 2014 to 2016 and L405 2013 to 2016
In the Body Control ECU, Car Config Function
– Tow bar -> With Trailer Tow Attachment
– Towing Aero -> Fitted (Tow assist, will only work if surround cameras are fitted)
– Trailer towing ball -> Fitted
– ElecDepTowBar -> Fitted, if fitted…
– Towing – Nas Trailer Lighting Function -> Fitted, if fitted…
All 2004-2009 except Range Rover L322
In the Body Control ECU, Car Config Function
– Tow bar -> Yes
2017+ (draft)
In Menu–Car Config–Complete List, use the search box:
– Towing -Nas Trailer Lightning Function -> Enabled (taken from a North American vehicle, may be Disabled on Rest Of the World)
– Trailer towing ball -> Fitted
– Rear Foglight Tow Function -> Foglights shut off when trailer is connected, only trailers foglights are running
– Towbar -> With Trailer Tow Attachment
– ElecDepTowBar -> Fitted or Not Fitted depending on the hardware installed
– TowAssist, to be confirmed
– HitchAssistTowbar, to be confirmed
With deployable tow bar;
MultiCAN-504 NoseLoadMeasure = Fitted (for L462 and L663 only)
MultiCAN-504 TrailerLightMod = Fitted
MultiCAN-504 ElecDepTowBar = Fitted
MultiCAN-502 EDTType = Brink MXe HD
The earlier Discovery 4, 2010 and 2011, are fitted with a ZF 6-speed transmission. Land Rover never intended for flappy paddles to be functional on these model years. GAP Diagnostic has modified the transmission firmware to enable them. This enabling is exclusively available with an IIDTool and for the following engines:
-3.0L SDV6
-3.0L TDV6
-Petrol
Available via Fast Lane for the regular IIDTool and IIDTool BT. Embedded in the IIDTool Pro.
Unfortunately, the flappy paddles cannot be enabled on vehicles fitted with the 2.7L TDV6 engine.
GAP Diagnostic modified the 2007 and up instrument pack firmware so that it behaves accordingly on earlier 2004 to 2006 Discovery 3/LR3 and Range Rover Sport.
This modification allows adding the clock display without any of the following inconvenient:
- Auxiliary heater lamp (red indication, left of the information display) turning on when the headlamps are activated
- Incorrect MIL locations. On Petrol vehicles only, the amber «parking brake» indicator light replaces the «check engine» light on 2007 and up vehicles. This is not the case with the modified firmware. Both lights remain at the same position.
This feature is only available with an IIDTool. Please refer to the user manual for additional details.
It is now possible to replace a defective instrument pack with a used unit for the following vehicles:
- Discovery 3/LR3, All
- Range Rover Sport, 2005-2009
This feature is only available with an IIDTool. A brand new Instrument Pack unit is required for all other diagnostic tools. Available upon request only.
Menu->Car Config->Audio Control Module->Type Multi Media set to High
This can only be done on Range Rover 2002-2005. All other vehicles can have the standard height changed only which is the reference point for all other height modes. For example, if the standard height is increased by 10 mm (Menu->Height->Adjust All), all other height modes, Offroad, Access and Highway height, will also be 10 mm higher.
Up to 2009 vehicles
Changing the CCF setting is not sufficient. Please refer to the IIDTool user manual for additional instructions.
2010 and up vehicles
Enabling destination while on the move cannot be done with a diagnostic tool.
All 2010 and onward
IIDTool Menu->Car Config->BCM Body Control->
- Cruise Control Display set to Full priority
- JAG Cruise Control set to Normal
- Cruise Control set to Fitted
Discovery 3/LR3, Range Rover Sport up to 2009
IIDTool Menu->Car Config->Instrument Pack->
- Steering wheel control set to Resistive ladder 1
- Speed Control set to Fitted
For Discovery 3/LR3 and Range Rover Sport up to 2009
This cannot be done since Land Rover never implemented it. Aftermarket kits are available.
For 2010 and up vehicles fitted with a FBH (not the electric heater)
IIDTool Menu->Car Config->HVAC Ventilation->
- FBH Call Start is equal to Fitted radio. This is the one related to the remote.
- Fuel Burning Heater is equal to Fitted parking heat
- Timed Climate is equal to Enable
For Range Rover 2002-2004
IIDTool Menu->Car Config->ATC Heat Cool->
- Aux Heater is equal to Yes
- Park Heater is equal to Yes
IIDTool Menu->Car Config->Instrument Pack->
- Park Heating is equal to Yes
- Park Ventilation is equal to Yes
Note: On 2002 to 2004, the park heating function may take up to one week before it becomes available on your monitor when activated.
For Range Rover 2005-2009
IIDTool Menu->Car Config->ATC Heat Cool->
- Aux Heater is equal to Yes
- Park Heater is equal to Yes
IIDTool Menu->Car Config->ACM Audio Control Module->
- Park Heater is equal to Yes
- Auxiliary heater is equal to Yes
On Discovery 3 and Range Rover Sport up to 2009
Remove the wheel sensors and disable the TPMS in the CCF, Menu–Car Config–Body Control. You can also leave the sensors and disconnect the fuse. This will however disable both the TPMS and parking aid (PAM) ECUs. Else, disconnect the TPMS ECU itself (in the center of the headliner, quite an involving task) and redo the CAN connections (pass through).
On Range Rover up to 2009
Remove the TPMS fuse and disable the TPMS in the CCF. Menu–Car Config–Tire Pressure Monitor System
All 2010+
Disabling:
Remove the wheel sensors and disable the TPMS in the CCF, Menu–Car Config–Body Control.
Note the setting values before changing. Will come in handy if re-enabling is required in the future.
- TPMS on Spare Wheel
No - Tire Pressure Monitoring 1
This one is generally not used - Tire Pressure Monitoring 2
None
Enabling:
- TPMS on Spare Wheel
No or Yes… - Tire Pressure Monitoring 1
None - Tire Pressure Monitoring 2
TPMS Fitted
Range Rover L494, Enabling;
- T5-037 Tyre Pressure Monitoring System – Tyre Pressure Monitoring System = Undefined
- EUCD-101 Tyre Pressure Mode System = TPMS With WBL, DLS (Heavy Default) & No HSPA & No WT US
In other words, the feedback received by the suspension ECU suggests an incongruity between actions and reactions. The first thing to verify is each height sensor calibration (consult the user manual). This may also be caused by a bad sensor or wiring.
This fault is very common on these vehicles and should be left alone.
The tool will not point to which parts need replacing but it is the first line of defense when trying to diagnose a problem. Reading ECU’s fault, if the ECU registered some related to the issue, will help in finding the source of the problem. Other features like live values, service routines and others will also help. Keep in mind that it’s not a substitute to troubleshooting the problem but a helpful and most of the time essential tool.
Pre 2010 vehicles:
Menu->Car Config->Audio Control
- Bluetooth set to YES
- Telephone set to DOCK_BT.
2010 onwards:
Menu->Car Config->Audio Control
- Bluetooth set to Bluetooth enabled
- Bluetooth handsfree telephone set to Bluetooth handsfree telephone system
- Cellular telephone set to Cellular docking wBluetooth
There is a procedure to reset all COM ports so that they become available. The following webpage explains the procedure for windows XP and 7.
http://blog.cognitioninfotech.com/2009/01/how-to-clear-or-reset-com-port.html
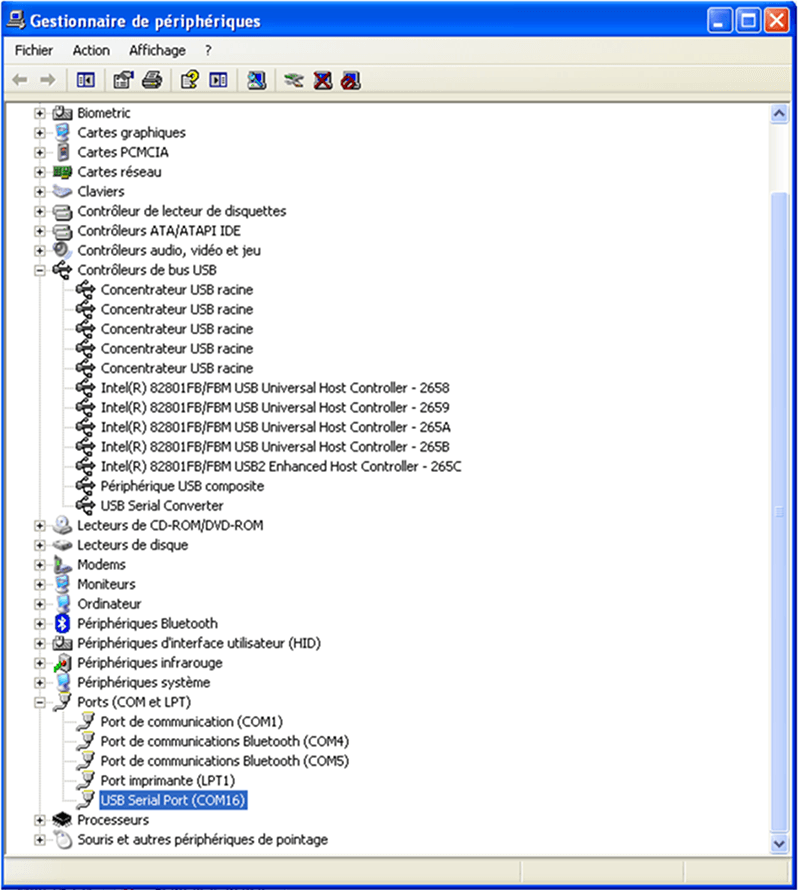
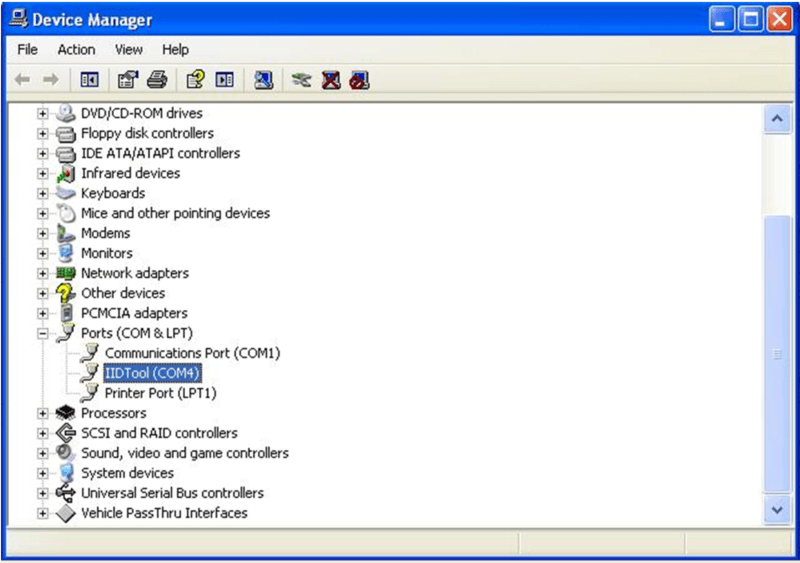
The COM port number allocated to the unit must be verified.
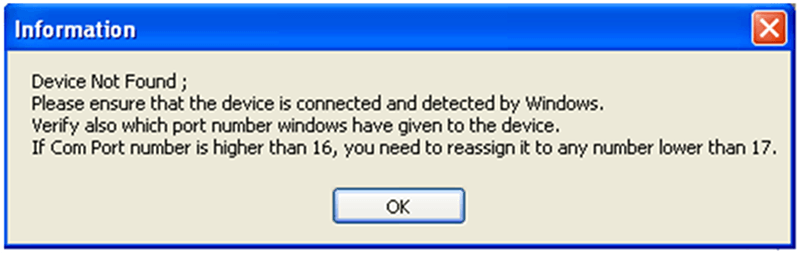
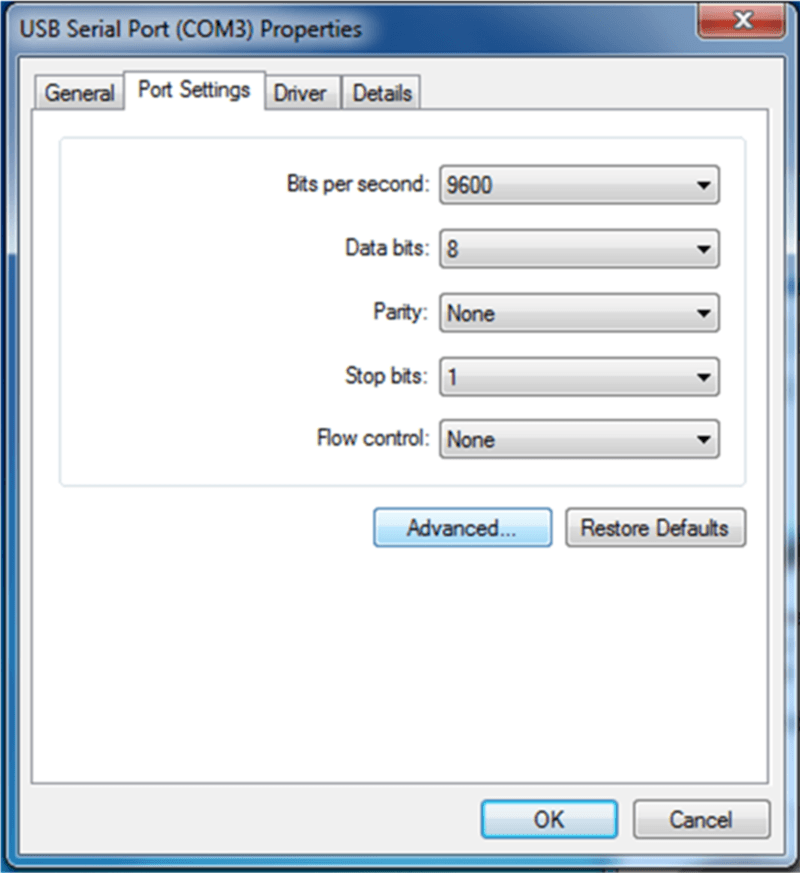
To verify the port number on windows XP:
Control Panel -> system -> Hardware -> Device Manager -> Port Com
There should be one named USB Serial port (COM XY), the following picture shows an example
The device name might be displayed
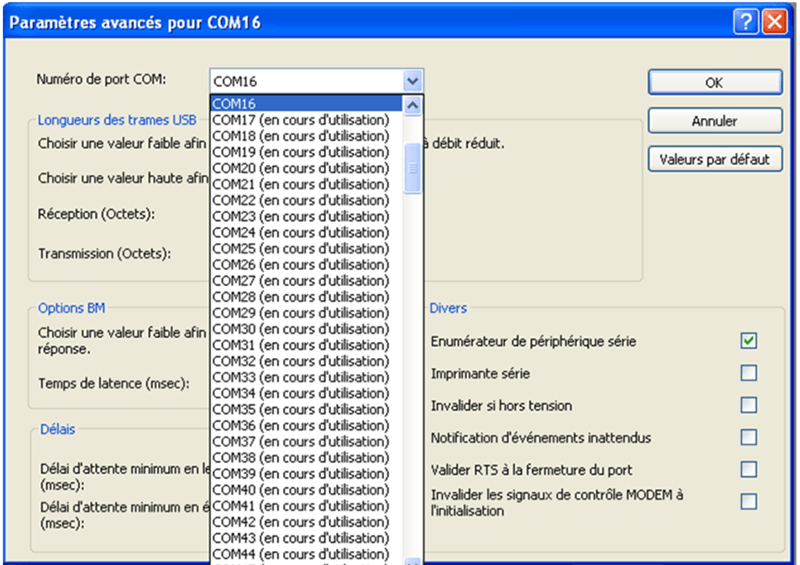
Double click on the device and select port setting. Select advance.
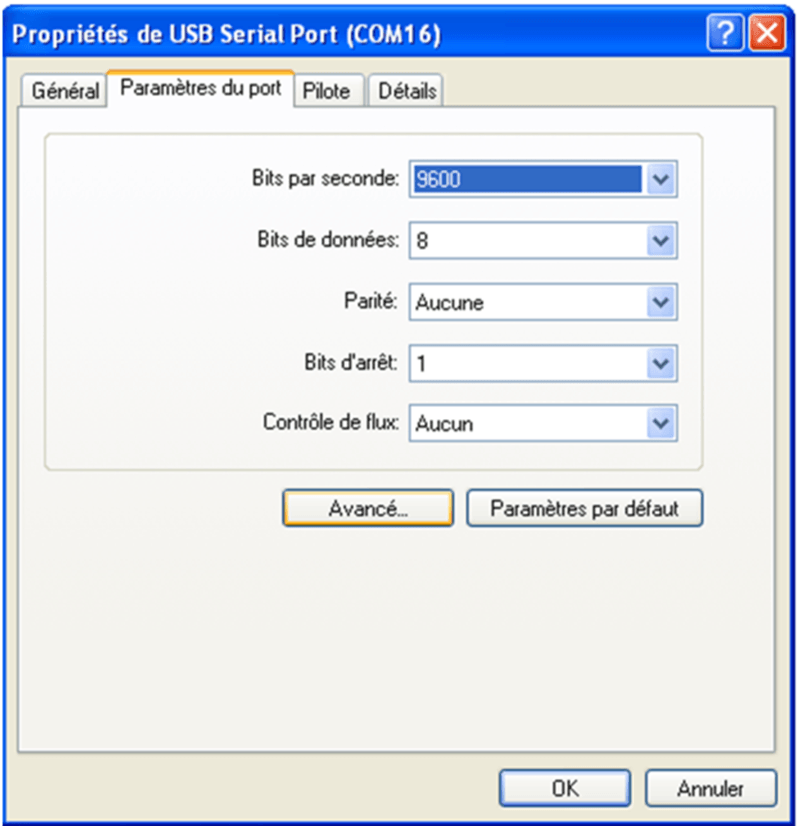
Change the port setting to a number lower than 16. Once this is completed, please try to update the device again.
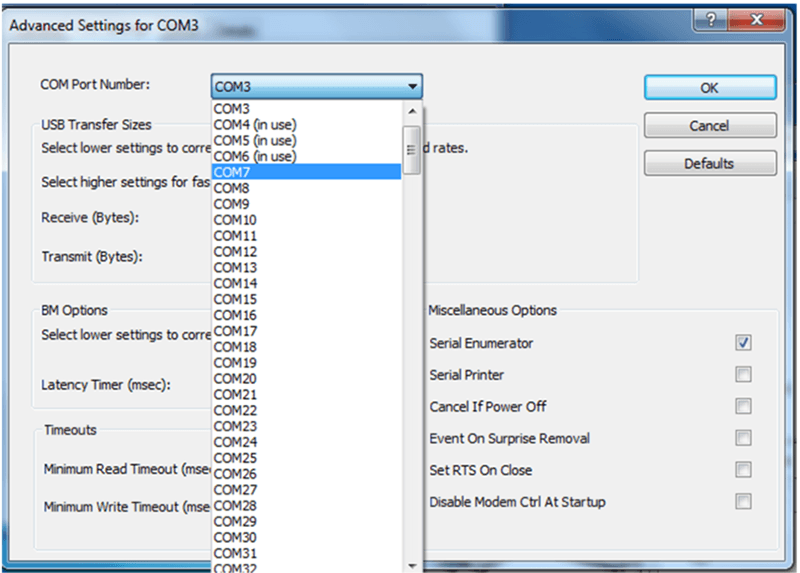
To verify the port number on windows 7:
Select Devices and Printers
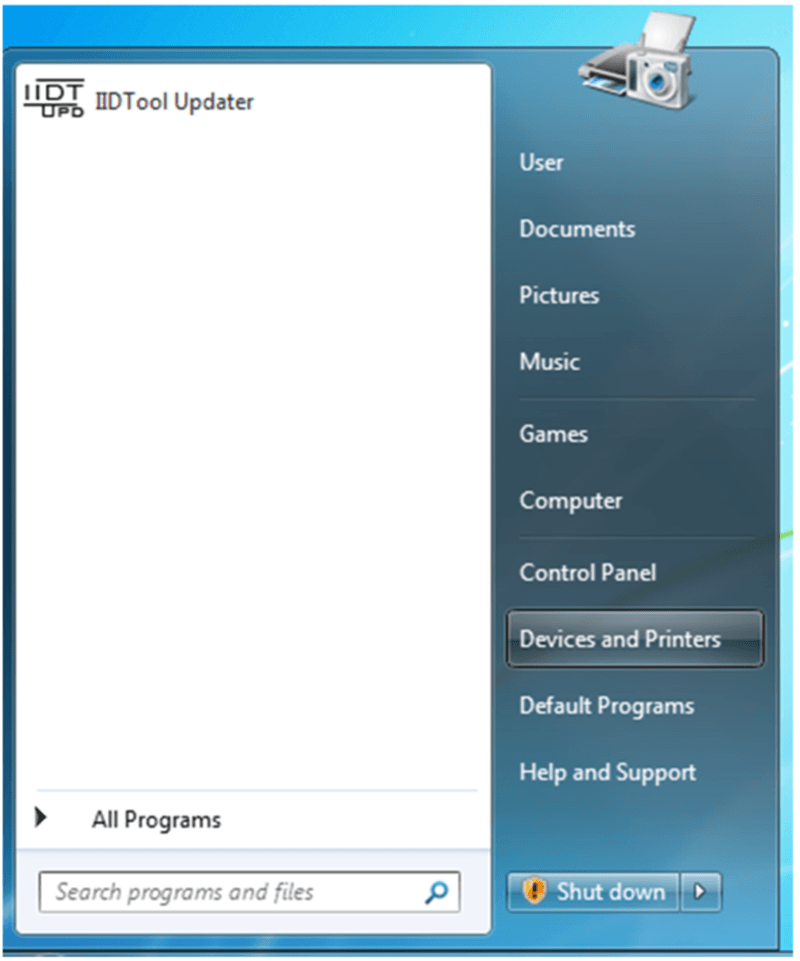
The IIDTool icon should be visible
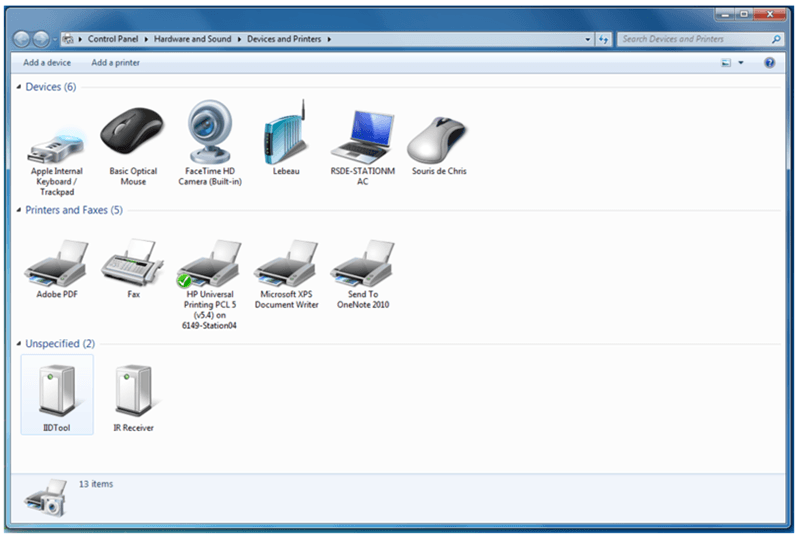
The port number will be shown, in this case it is COM3. If its 17 or more, it needs to be changed.
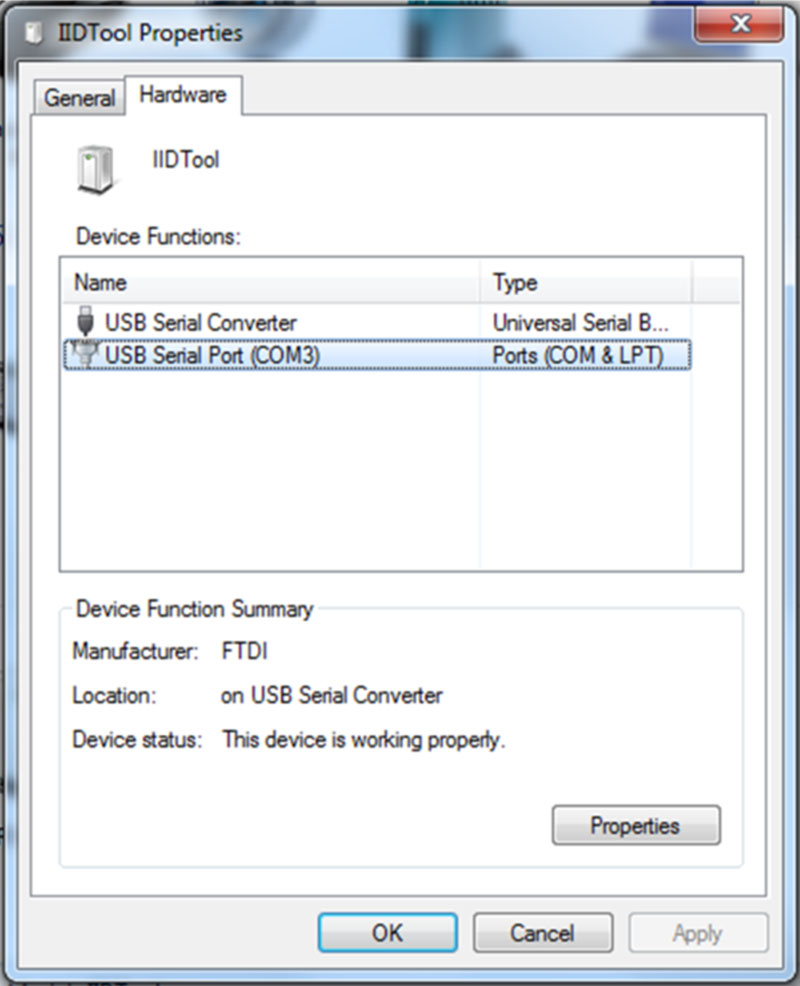
Select Properties and port setting
Select Advanced
Change the port number to anything from COM1 to COM16. Once this is completed, please try to update the device again.
If this hasn’t solved the problem, please contact us.
I enabled the rear view camera setting on my Discovery 3 / Range Rover Sport. Why is it not working?
In order to make the rear view camera image appear on the navigation screen when reversing, the screen needs to be modified. This will fool the navigation screen to think that it’s in a Range Rover.
The following thread from Disco3.co.uk explains the procedure:
Yes, it will work on any supported vehicles. Market/country specs do not prevent our products from working.
The IIDTool in itself does not perform any diagnostic or problem detection. It gives access to faults stored in the vehicle’s ECUs.
Unfortunately, ECU fault detection algorithms cannot detect every problem. The majority of faults relate to external devices (sensors, etc) or wiring issues.
Here’s a quick general explanation into diagnostic tools/systems.
There are 6 basic functions for a diagnostic system:
- Fault (DTC- diagnostic trouble code) reading and clearing
- Live Value display
- Editing the car configuration files (CCF)
- ECU Flashing
- Executing service routines/manually actuating components (testing function)
- Initializing, calibrating, or programming new components
Starting with the lowest priced units, even a 50 $ generic code reader will read and sometimes clear the codes on anything that is emissions related (engine+drive train). The downside is that they will not work on all vehicle systems, including manufacturer specific fault codes (air suspension, etc). All other features in the list above are not supported on generic code readers except for a few emission related live values.
The IIDTool will allow you to read and clear manufacturer specific fault code on all ECU’s and give you access to all other features listed above. This is why it is called a complete diagnostic system for your Land Rover.
A diagnostic system is an interface to read / clear fault of specific ECUs and much more.
A system tester is a devices especially built to test all components of a defined system. For example, if you want to test the light signals of a trailer connection, a tester is connected and a test sequence is performed (lights on, right flasher etc). The tester lights will turn on accordingly.
Usually, this is caused by a bad connection.
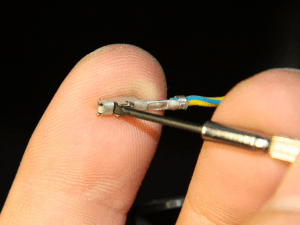
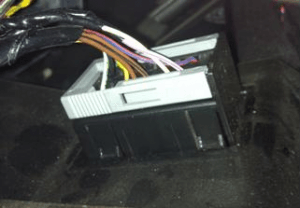
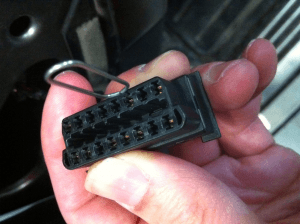
Some of the OBD connector terminals are either dirty, corroded or bent.
- Try pulling the bottom edge of the IIDTool towards the seat or towards the door or center console (Range Rover 2002-2006). It may work and if the force is released, the unit will no longer respond to cruise control commands. In severe cases, it will not work even if the unit is pulled or pushed.
- Inspect and clean the terminals. Wires may be corroded if water reached this area. Use a contact cleaner that can be sprayed on the OBD connector and use the IIDTool to clean the connector by quickly connecting it in and out. A small and thin nail file can also be used to clean each terminal one by one. Remove the OBD connector to gain access to the wires and verify their condition. Instructions on how to remove the OBD connector can be found below. Yes, it’s normal for the OBD connector not to have all terminals in it. And yes, it is by design that the IIDTool connector has two longer pins. These are two ground pins that need to connect first when you plug the unit.
- Sometimes mechanics are a bit rough when connecting or using their Diagnostic units and this can bend the terminals.
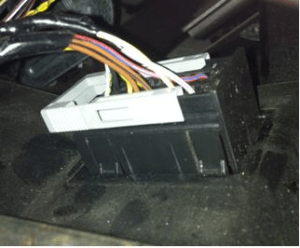
All except Range Rover 2002-2009
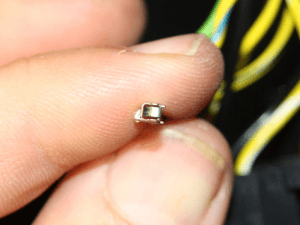
Here’s how they look when bent
Bent and fitted to the connector
Use a small jeweler’s screwdriver to remove each terminal and close up the blades in each terminal
Repaired
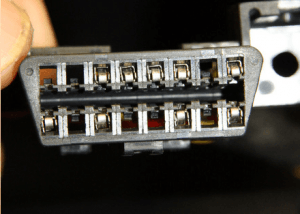
For Range Rover 2002-2009
The following picture shows the difference between a bad and a good terminal. The bad terminal is exaggerated for the purpose of this explanation.

You can repair the terminals with the OBD connector still in place but we recommend removing the OBD connector from its housing for ease of access. Unless you have the correct tool, the terminals are hard to remove from the OBD connector, we do not recommend it. You can do the repairs with the terminals still in place.
Here are some pictures showing how to remove the OBD connector from its housing on a Range Rover 2002-2006.
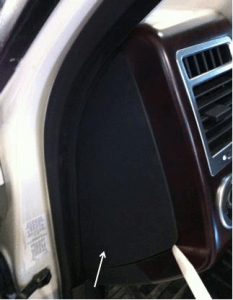
First, remove the plastic cover on the driver side.
Looking into the hole, you will see the OBD connector.
Pull on the grey lock to unlock the OBD connector.
Push on the OBD connector.
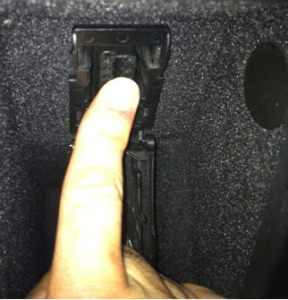
The OBD connector is now released from its housing.
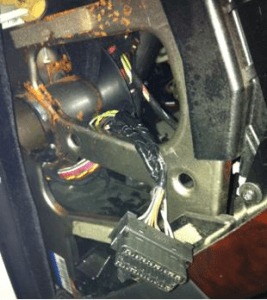
The process is similar for 2007-2009 Range Rover except for the first step which involves removing the lower dash cover where the pedals are located.
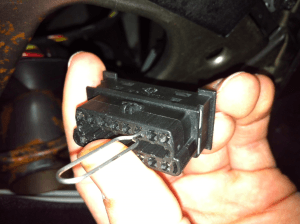
To repair the terminals, simply insert a trombone like metal rod into the small opening at the top of the OBD connector (see pictures below). Inserting the trombone is most likely to be enough to do the repair. Repeat the process for the bottom opening. Be careful to insert the trombone correctly (straight or at a small angle away from the terminal) to prevent bending the terminal too much. Here are some pictures showing the process. In this case, we used a tool to remove the SIM card from an IPhone.
Or, can the IIDTool help when the suspension becomes inoperative? Can it close any specific valve for any corner and keep it closed while you limp off the trail?
Yes. For example, when an air strut fails, the suspension ECU detects a major fault since it is not able to raise the corner. In some cases, it lowers all corners to the bump stops. The lowering may be caused by the air leak itself since on normal operation, corners are adjusted in pair.
To manually control the air suspension, proceed with the following:
- IIDTool Menu->Service Test->Suspension->Test Valve->Select the Front Axle only, adjust to the desired height
- IIDTool Menu->Service Test->Suspension->Test Valve->Select the Rear Axle only, adjust to the desired height
- Each corner can be adjusted independently if needed
Keep in mind that raising both axles using Adjust All is not recommended since it takes much longer to reach the desired height. This is because the pressure equalizes when all four corner valves are opened (air goes from the front airbags to the rears) thus increasing the time required to raise the front axle.
If you are raising the vehicle significantly, the compressor may need to cool down before it can pump additional air in the system.
Once the desired height is reached, exit Test Valve mode and disable the suspension: IIDTool Menu->Service Test->Suspension->Build Mode
When finished, simply put it back into customer mode by calling the Build Mode function once more: IIDTool Menu->Service Test->Suspension->Build Mode
Not raising all four corners will put the vehicle out of balance and this can cause a safety hazard. We do not recommend driving an unstable vehicle but it can be useful to recover the vehicle with a defective EAS while offroad. Do not drive an unstable vehicle at high speed.
Use the height function to raise the standard height which is the reference point for all other height modes. IIDTool Menu->Height… you can adjust by increment/decrement of 1 mm. Keep in mind that a 1 mm increase in the ECU will be a bit more at the wheel because of the sensors non linearity and this difference increases as you get farther from the sensors linear range. Here’s what we suggest:
- Save the current height in My Setting 1: IIDTool Menu->Save Restore->EAS… Save My Setting 1
- Modify the standard height for offroad usage: IIDTool Menu->Height->Adjust All, Front or Rear
- Once at the desired height for offroad, save it to My Setting 2: IIDTool Menu->Save Restore->EAS… Save My Setting 2
- You can recall those saved settings at will: IIDTool Menu->Save Restore->Restore EAS… My Setting X
The IIDTool saves the calibration values which are constant and not dependent on the surface.
Start by clearing all faults. If the problems were corrected or intermittent (glitches), the faults won’t come back. If they do come back and a system malfunction confirms the fault is/are real, further diagnostic is required. For more details on faults and how to interpret them, please consult the IIDTool user manual.
Keep in mind that a Land Rover without any fault codes doesn’t exist.
There are two reasons why the service reminder will not appear.
• If it is an armored vehicle, the reminder is deactivated.
• The reminder is deactivated on vehicles destined to specific market zone.
The function will be activated once you perform a Service Interval Reset using your IIDTool. The service reminder should appear next time it is due.
If a vehicle hoist is to be used:
- Raise the vehicle using the hoist until all wheels have left the ground.
- Use the appropriate deflate function found in the service test menu.
- You can now proceed with replacing the strut*.
- Re-Enable the EAS ECU using your IIDTool (consult the user manual for more details).
If the work is to be done without a vehicle hoist:
- Make sure the vehicle is on a flat and level surface.
- Change the suspension mode to offroad
- Raise the vehicle at maximum height using the Test Valve functions (Adjust Front and/or Rear).
- Install jack stands at the appropriate locations showed in the vehicle’s owner manual**.
- Use the appropriate deflate function found in the service test menu.
- You can now proceed with replacing the strut*.
- When finished, repeat step 3 and remove jack stands.
- Re-Enable the EAS ECU using your IIDTool. (consult the user manual for more details).
*Always use caution when disconnecting any air suspension component. There may still be residual air inside.
** Always use jack stands, never use a hydraulic jack to hold the vehicle.
Actually, only the first part of the statement is accurate: more air, yes. Higher pressure, no. Only the volume is increased or decreased (spring diameter assumed to remain constant).
The effective spring rate is relatively constant over the whole suspension height range. The element that does come into play and affect the suspension behavior (comfort…) is the pistons that the air bag rolls on to upon lowering (changing the effective diameter of the air spring). The aftermarket industry played with varying piston diameters on their replacement springs. Some of them offer springs that are softer at off road height and firmer at motorway height. On stock LR suspensions, firmer/less firm rides are likely more attributable to progressive shock damper rates than anything else.
This is not currently available. It may be done in the future depending on how easy/difficult it is to implement. For safety reasons, we will limit the speed maximum increment. For example, from stock 50 km/h to 60 km/h.
Both the EASControl and IIDTool rewrite the target height values of the EAS ECU. Once completed, the unit is disconnected. Do not leave the tool permanently connected.
This is caused by the sensors output curve non linearity. The further away from the central point, the higher the difference. We recommend measuring after each height changes to validate.
The use of rods in conjunction with the IIDTool or EASControl will allow for a greater range than software changes alone. The EAS ECU allows only a limited range of adjustments for safety reasons. We do think an otherwise stock suspension and stock vehicle would be at the limits of what is sensible and what is actually an improvement even in extreme circumstances. Therefore, we do not recommend the use of rods in conjunction with the IIDTool or EASControl.
The earlier Range Rover 2002-2005 have no limits even if values entered are mechanically out of range. For safety reasons, we’ve implemented a limit of 200 mm in the EASControl and IIDTool on the raising side only. This limit is absolute therefore the relative height change depends on the actual sensors calibration and will vary on each vehicle.
When lowering, you can reach the bump stops but we suggest staying higher unless you want a bumpy ride. If set too low, the EAS ECU will never be able to reach its target. This will in turn prevent the ECU from shutting down thus draining the battery. In this case, the center console EAS light will keep flashing even if the vehicle electronics have shut down.
For other vehicles, Range Rover 2006 onwards, Range Rover Sport 2005 onwards and Discovery 3-4 / LR4, the EAS ECU accepts only values between 150 and 250.
Again, the actual maximums will depend on the sensors calibrations. For example, and to stay “not too technical”, here are the real limits found on a Range Rover Sport 2008 and Range Rover 2007 from the original calibration.
Range Rover Sport 2008
Raising max +33 mm
Theoretical lowering max -35 mm
Real lowering max -18 mm, this keeps the access height higher than the bump stops.
Theoretical Lowering max -35 mm
In this example, one can go as low as -35 mm from the original standard height. In which case, it would not be possible to select the access height because the vehicle would reach at least one of the bump stops. When a bump stop is reached, the EAS ECU believes the vehicle is grounded and activates the extended mode (the vehicle is raised higher than the off road height).
Real Lowering max -18 mm
If you want to keep using the access mode, -18 mm would be the maximum lowering of the standard height in this example. The vehicle will reach the bump stops when access height is selected with the standard height lowered more than 18 mm. This value was empirically found and will differ depending on the vehicle.
Range Rover 2007
Raising max +22mm
Lowering max -22mm
The Range Rover Sport height sensors positions are more comparable between the front and rear than on the Range Rover 2006-2009. This is why the range extent is wider.
When Access mode is selected, the vehicle reaches the bump stops and this activates the extended mode. It’s a compromise users have to make between standard and access heights. Please read the “What are the maximum adjustments one can apply to the standard height setting?” for further explanations on the subject.
Variations from 0-10 mm are normal. A perfectly flat and level surface does not exist therefore the ECU accepts an error factor called tolerance. To verify the calibration, go to the view current height function in the view value menu. The difference between left and right side current height values should be similar to the difference measured at the wheels.
For example, the measured values from wheel center to the bottom of the wheel arch:
- Front left = 492 mm
- Front right = 495 mm
And the live values are:
- Front left = -2 mm
- Front right = + 3 mm
Which brings us to target heights of:
- Front left 492 + 2 = 494 mm
- Front Right 495 – 3 = 492 mm
The difference being 2 mm, this confirms a good calibration of the front sensors.
This is normal. Height changes are always made relative to the current standard height. For example, if the adjust all function is set at -10 mm and then again at -5 mm, the vehicle will be at -15 mm.
Yes, this function is used for that purpose only.
The IIDTool will allow disabling the front sensors or disabling the whole system (front and rear sensors). The rear sensors cannot be disabled independently while keeping the fronts functional.
The number shown is not related to the number of faults cleared. It shows the number of ECU’s on which faults were cleared, even if none were stored.
This is caused by a bad ribbon cable inside the instrument cluster. The part can easily be found over the internet. Suppliers will offer to replace the cable for a fee which we recommend since it is not easy to do.
Although we recommend using an IIDTool BT, the PC based interface can be used in this instance. Please refer to the user manual for more details.
Changes in height are instantaneous in the EAS ECU but the ECU won’t physically apply these changes immediately. In normal tolerance mode, the EAS ECU will adjust a corner when it’s +/- 10 mm or higher than the desired height. For example, if the corner is at +9 mm, the ECU will not correct the height.
You can force the EAS ECU to adjust the height by going to off-road or access and back to standard height. Keep in mind that small changes in height will be hard to measure and a 1 mm change in the ECU is superior at the wheel due to the sensors non linearity.
When a bigger change is made, the vehicle will have to be moved to see the full extent of the change. Moving the vehicle will release the tension created on tyres (or tires, camber).
The rear sounder is a speaker connected directly to the PAM ECU
There are 2 possible causes:
- The speaker itself can be defective
- There can be a wiring problem between the PAM ECU and speaker.
Before replacing the speaker, one should confirm that it is not related to a wiring issue.
First, if there is a trailer hitch on the car, remove it. If the problem persist, further diagnosis is necessary.
In most cases, the fault codes are sensor related. Several cases of cut or damaged wires in the bumper covers have also been reported. If all wires are in good condition, try to switch sensors positions. This will determine if the problem is wire or sensor related.
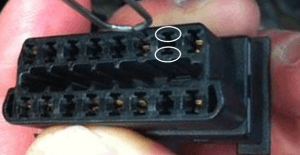
In this example, the rear right sensor fault is present.
- Disassemble the rear bumper cover to get access to sensors and wires*.
- Inspect the wiring. If no damage is found, go to the next step.
- Take the rear left sensor and connect it to the right and vice-versa
- Clear the PAM faults using the IIDTool.
- Start the engine and select reverse gear**. If the audible warning is present, go to the next step. If not, you might have to play around with it until it comes back.
- Shift the transmission in park.
- Read the PAM faults using your IIDTool.
If the error is still on the right side, this will confirm a wiring issue. If it is now on the left side, it is related to the sensor itself.
* Videos showing the procedure are available on YouTube: How to remove rear bumper on…
**The vehicle must be outside. Make sure there’s no object behind the vehicle which could trigger the system.